Verisurf Reverse Engineering Keeps B-52s Flying
Read this story in Quality Digest Magazine HERE
By FARO, Inc.
As a depot-level overhaul service provider for the Department of Defense and some of the major commercial aerospace companies, Mission Support has been engaged in the repair, overhaul, and manufacture of aircraft subassemblies since 1990, including airframe structural components, flight controls and the associated actuation systems, landing gear, and other flight-critical components (e.g., for aerial refueling). Based in Clearfield, Utah, Mission Support is an AS9100- and ISO 9001-registered manufacturer and maintenance/repair/overhaul facility, as well as a certified FAA Repair Station.
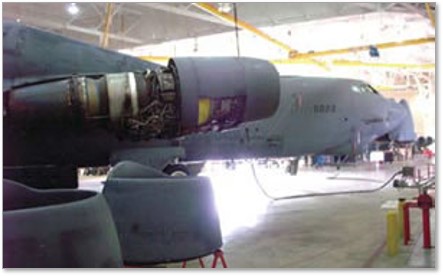
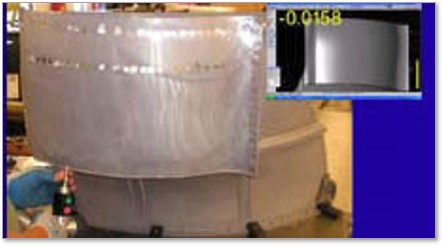
This photo shows a bypass engine duct in its “before” state, how many ducts were not lining up correctly with the mating components before this reverse-engineering process took place.
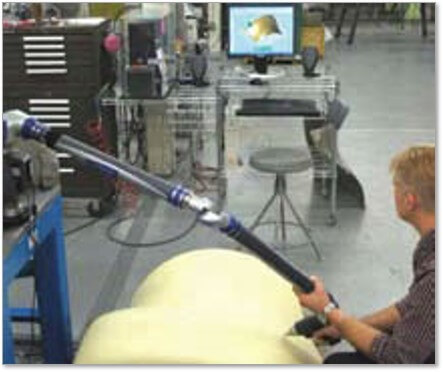
Reverse engineering the original master molds into CAD.
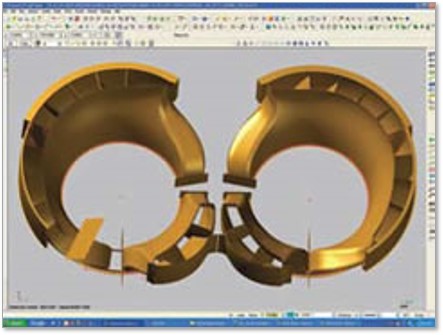
Reverse engineered solid models of all six (LH and RH) bypass engine duct configurations.
Creating a trim line for the mating cowlings from the CAD solid model using the FARO arm.
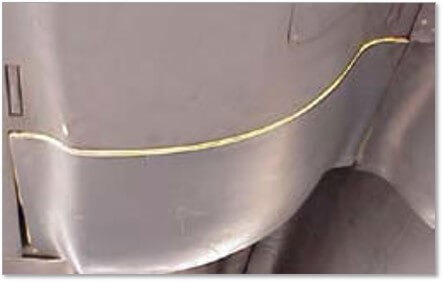
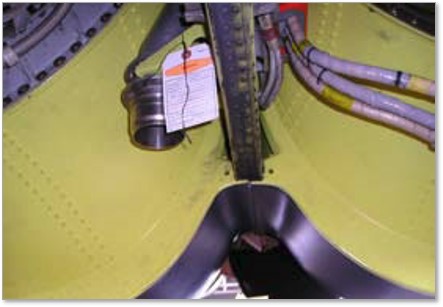
This photo shows the “after” condition of the bypass ducts built with the FARO arm system, and how their profiles and attach points now line up correctly.
Mission Support Inc. has pioneered the combination of sheet metal fabrication and modern computer-aided design and computer-aided manufacturing (CAD/CAM) dimensioning technology for improved production capabilities. They have also been leaders and innovators in the implementation of real-time CAD/CAM digital inspection of U.S. Air Force legacy aircraft components.
Click the image above to watch a video version of this story:
Mission Support was contracted by the U.S. Air Force to overhaul the engine bypass ducts on B-52 Stratofortress bombers. The most difficult issue confronting the company in the performance of this contract was the lack of adequate technical data, which resulted in fit and conformance problems with the overhauled bypass ducts. The company’s solution to this dilemma demonstrates an intertwining of many years of sheet metal expertise with modern CAD/CAM technology. The following article describes how Mission Support solved several different production issues using portable coordinate measuring machines (PCMM’s) and Verisurf Digital 3-D CAD software.
Maintenance Repair & Overhaul Problems
Mission Support essentially remanufactures the bypass ducts of the B-52, often performing a complete disassembly and reassembly during overhaul. Most of these engine ducts have been in operation on the aircraft for more than 30 years and many are misshapen, corroded, or distorted; and using the original hard tooling to rebuild them proved to be a nonviable option.
Even though they often have the original hard tooling and fixtures from the original equipment manufacturer (OEM), these tools are cumbersome and less accurate than required, and the associated mylar data is incomplete. This makes it difficult to reconstruct the needed parts because the older tools lack the accuracy needed to locate the critical attach points to be within the OEM drawing tolerances. Also, a lot of the upstream and downstream tooling originally used by the manufacturer to create these parts simply does not exist anymore. Even so, without a better alternative, this old tooling was used for years to overhaul these structures.
As the dimensioning technology utilized for inspection improved, Mission Support found it increasingly difficult to produce conforming products using the original hard tooling—even after calibration of these tools. Increasing reports of fit problems from the field showed the need for a better solution. As the Air Force made the determination that the B-52 was to be kept in service for three more decades, they were also requiring overhauled components to be rebuilt to much tighter tolerances. It was apparent that a better solution needed to be implemented.
Verisurf Solution
The first step to solving these problems was to convert the existing technical data into a 3-D solid model utilizing reverse engineering. Mission Support conducted dimensionally accurate scans of the available Mylars. Utilizing a PCMM with Verisurf REVERSE software Mission Support generated point cloud profiles of the old master molds. They then hand-entered as much data as was available from existing tooling drawings. This effort produced 3-D CAD solid models for all six duct configurations. Mission Support then calibrated the original assembly fixtures and subsequently revamped manufacturing of the ducts themselves, eventually incorporating CAD/CAM technology at every level of their production process. These implementations effectively solved the fit problems for all of the critical attach points and contours that were being encountered by the Air Force in the field.
These ducts are fairly large aluminum sheet metal assemblies (typically three to five feet) that have a lot of inherent distortion and damage from being on the aircraft for several decades. The CAD data was initially used solely to evaluate the condition of damaged engine ducts sent from the field for overhaul, as well as to inspect the finished bypass ducts with a FARO arm. Production continued using the hard tooling to reconstruct the ducts. However, very few of the bypass ducts produced in this manner would pass inspection since using the hard tooling could only get them to within approximately 0.060 in., while the required tolerance is ±0.010 in.
In an effort to improve the dimensional accuracy of the placement of the piece parts reattached to the ducts, Mission Support production personnel tried locating everything using the FARO arm. Eventually they developed a number of production techniques using it as a “virtual tool” in the production process to rebuild the engine ducts instead of the hard tooling.
“The results were immediately positive once we tried using the FARO arm to locate all of the features, in lieu of the hard tooling,” says Richard Hansen, Mission Support’s quality assurance (QA) manager. “The manufacturing and inspection process of these parts became much more accurate, and this has been our solution ever since.”
Mission Support now uses the PCMM for both their production and QA inspection needs because it can be used directly on the shop floor and provides accuracy comparable to a traditional CMM. Mission Support has several arms and they use them, along with Verisurf software, to locate components and create contours and profiles. Using this system, they no longer need any of the old tooling—everything is now reconstructed using PCMM data to compare the unit under construction to the perfect digital CAD nominal.
Since implementing this system, the dimensional conformity of the engine ducts is much more consistent, with not one quality defect on the fit. It has been such a successful program that Mission Support was granted a sole-source supplier contract for these ducts to the Air Force. That is not to say that the transition to using the new technology for production was completely smooth. There was a lot of painful trial and error during the implementation process. The production department was initially reluctant to use the technology, but once they had been trained, Mission Support technicians discovered that using the PCMM to reassemble the ducts reduced the number of inspection failures and improved product quality.
The production department has now embraced using the PCMM, since every feature and component of the engine ducts can be located and controlled using the virtual tool and the use of hard tooling is no longer required. Using this system, which Mission Support developed, to rebuild the ducts makes it much easier, less time-consuming, and much more accurate. This allows production to do their job in overhauling the ducts with new sheet metal components.
It is a unique process, one where Mission Support’s veteran sheet metal technicians use the old art of sheet metal fabrication—building and shaping parts by hand—and then use the PCMM and Verisurf to show them in real time where all of the profiles, trim lines, and attach points are supposed to be. It is a marriage of archaic hand fabrication techniques and new CAD/CAM technology.
After production rebuilds the ducts, Mission Support’s QA team then inspects the ducts using the PCMM with Verisurf ANALYSIS software. Each serialized engine duct receives a generated report for all of the critical attach points and profiles, and this report is used to demonstrate their acceptance to the government QA representative, as a final validation of its dimensional conformance.
“It really has been a successful system for us,” says Hansen. “We have had zero quality deficiencies on these ducts since we’ve implemented this system. It has made the fit of each engine duct consistent and accurate within the required tolerances.”
Mission Support is so confident in this new production technique that they see a market for using this same technique on other older legacy aircraft. “We couldn’t be happier with our new reverse engineering system, and the Air Force has been very satisfied that all of the fit problems with these B-52 ducts have gone away,” says Hansen. “We use our reverse engineering system at all stages of inspection and production—including the initial dimensional evaluation, tear down and inspection of the B-52 ducts, the reconstruction of the components and profiling of features, to the production, and the final QA inspection. We also use the PCMM and Verisurf to reverse engineer many of the old legacy components where technical data may be lacking, and use the CAD data to remanufacture new components via CNC [machining], and to inspect the finished components prior to their use.”
The proof, as they say, is in the pudding. The first article engine ducts built using this system of producing and inspecting the ducts with a PCMM were tested on the wings of several B-52s at Barksdale Air Force Base. It was immediately apparent that the attach points and profiles fit correctly to the aircraft. In the words of one Air Force technician at Barksdale after installing one of the first components, the new ducts “fit like a glove.”
Return On Investment
For Mission Support, the reverse engineering system has very much improved the consistency of their product and its overall quality. The increased accuracy and the greater ease of production and inspection have been a tremendous value. The return on investment doesn’t stop there when considering the high degree of customer satisfaction, since the previously very difficult problems have now been solved.
What used to take production weeks to locate and profile components on the ducts now takes only days. It is difficult to calculate precisely, but with the reduced production hours to overhaul the ducts, Mission Support estimates the savings could possibly be as high as $100,000 throughout the term of their B-52 overhaul contract.
“Implementing the FARO Arm and Verisurf CAD production and inspection systems has been a very wise move for us,” says Hansen. “It offers us a total reverse engineering, manufacturing, and inspection solution, and has given us a new degree of accuracy, consistency, and credibility in the quality of all of our products. Each serialized engine duct that we send to the Air Force has a report with the system measurements that validates its conformity, and we can say with confidence that the part will fit the aircraft within its required tolerances. We have also started using the reverse engineering system to inspect parts for our other contracts, and it has proven to be effective for each of those products and applications.”
Due to the success of the B-52 bypass engine duct program using the Verisurf software and the PCMM, Mission Support has recently received a new government contract from the Air Force for the A-10 Repair and Overhaul program. This contract will take the virtual CAD/CAM tool program one step further. Incoming A-10 structural components will be reverse engineered in real time using this system, and then rebuilt to the same dimensional profiles and contours as they were when they were taken off the aircraft. Since many of the mating components on the A-10 are inconsistent, they will need to be custom fit to the same dimensions as what they were when they were on the aircraft, previous to their rebuilding and overhaul.
This kind of reverse engineering and flexibility in the manipulation of nominal dimensional targets can only be accomplished in a digital CAD/CAM environment and is a field in which Mission Support is proving to be both an innovator and an industry leader.
For more information about Mission Support Inc., visit www.missionsupport.us or call (801) 773-7900.
##
About Mission Support, Inc.
Mission Support Incorporated (MSI) is an AS9100 & ISO 9001:2008 Certified Manufacturer and Overhaul / Repair Facility providing depot-level overhaul services to the US Air Force Material Command, Army Aviation, the FAA, and Naval Aviation. In general, we overhaul and manufacture airframe structural components, flight controls, and the associated actuation systems, aerial refueling, and landing gear. Mission Support has been engaged in the depot-level repair of aircraft subassemblies since 1990 and has managed over $25 million in repair contracts. For more information, visit the Mission Support website at www.missionsupport.us.
About the Author
FARO develops and markets computer-aided coordinate measurement and imaging devices and software. FARO’s portable equipment permits high-precision 3-D measurement, imaging, and comparison of parts and compound structures within production and quality assurance processes. The devices are used for inspecting components and assemblies, production planning, 3-D documentation, as well as for investigation and reconstruction of accident sites or crime scenes, and to generate digital scans of historic sites. Principal products include the Faro arm, the FARO Laser Tracker ION, FARO Laser ScanArm, FARO Laser Scanner, FARO Gage, and the CAM2 family of advanced CAD-based measurement and reporting software. For more information, visit the FARO, Inc. website at www.faro.com.
About Verisurf Software, Inc.
Verisurf Software, Inc. is an advanced three-dimensional measurement solutions company committed to delivering advanced computer-aided inspection and reverse engineering solutions. Verisurf software helps manufacturers of all sizes and industries produce higher quality products in less time and at a lower cost with automated, Model-Based Inspection processes. For more information, visit the Verisurf website at https://verisurf.com.

