3-D Model-Based GD&T for Inspection
A Key Element of Model-Based Definition
Read this story in Quality Magazine HERE
By Frank Ruotolo, Software Product Manager at Verisurf Software, Inc..
Reprinted with permission from Quality Magazine, November 4, 2015 issue, all rights reserved.
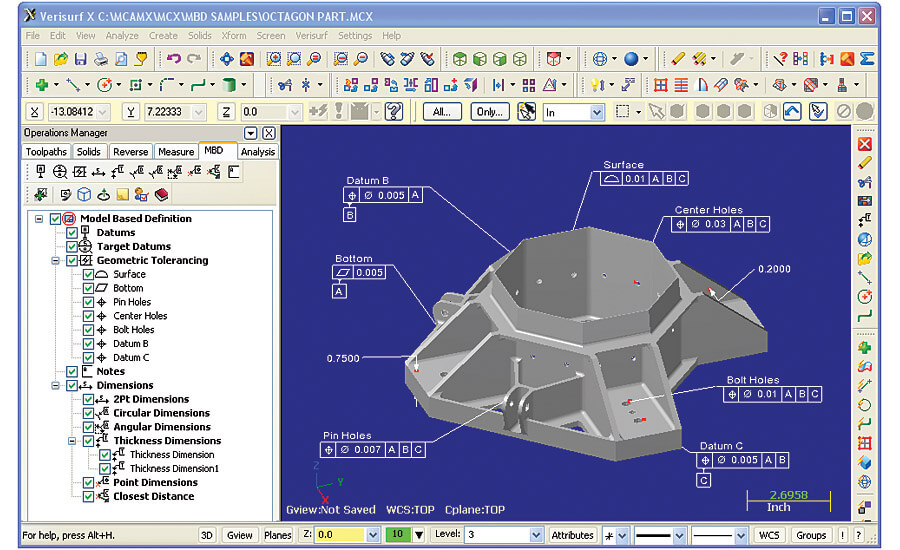
If your inspection software is based on a 3-D CAD platform, you can import intelligent GD&T data directly along with the 3-D model.
Source: Verisurf
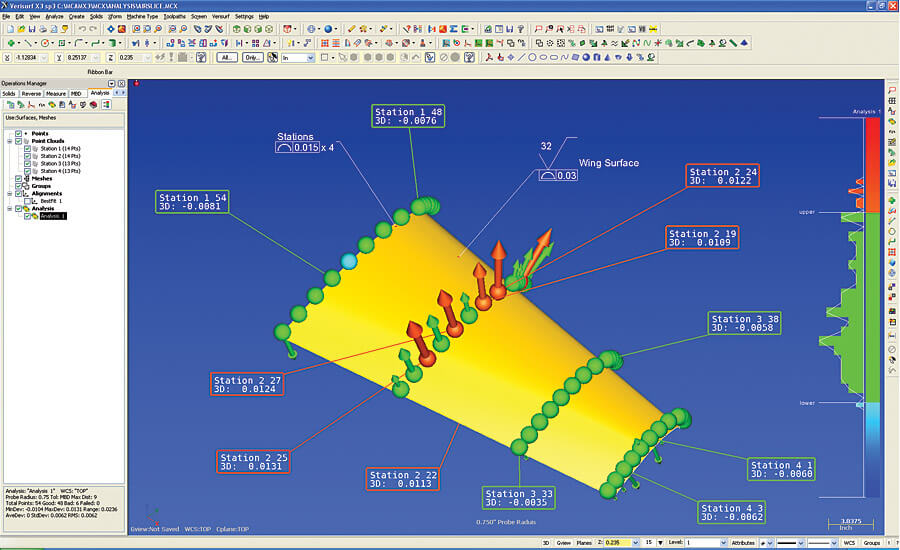
Software can provide real-time color-coded inspection feedback tied directly to intelligent GD&T definitions. Red – out of tolerance, high; Green – in tolerance; Blue – out of tolerance, low.
Source: Verisurf
The central concept behind model-based definition (MBD) is that the digital model contains all of the detailed information necessary for all aspects of the product life cycle. This includes everything from design to manufacturing, in particular, GD&T data.
When the digital model is the authority it removes ambiguity, conflict, and doubt that arises when drawings and models co-exist. When the 3-D model is the authority, MBD eliminates errors that result from referencing incorrect sources and makes processes more efficient.
There is a common misconception that MBD is synonymous with GD&T. In some circles, using GD&T on a model is incorrectly considered to be MBD. While GD&T is a necessary component of MBD, much more information is needed to have a true model-based definition. However, GD&T is a great place to start when moving towards MBD. It moves the CAD model from design to a manufacturing orientation. It opens the door to many advantages where software can automate and validate steps in the tolerance analysis, manufacturing and inspection processes.
The National Institute of Standards and Technology (NIST), in collaboration with their industrial partners, announced earlier this year a new project, which further demonstrates the evolution of the MBD concept. They will demonstrate feasibility—and benchmark the advantages—of using standardized, 3-D models for electronically exchanging and processing product and manufacturing information all the way from design through inspection of the final part, a tightly integrated, seamless string of activities that manufacturers are calling a “digital thread.” (ref: www.nist.gov/el/msid/201501_step.cfm)
GD&T
GD&T is a universal design language that has been rigorously studied and applied by manufacturers around the world and is widely considered by mechanical engineers to be an essential tool for communicating design intent, ensuring parts meet the desired form, fit, function and assembly. It includes important changes addressing the concept of feature design, datum references and degrees of freedom, surface boundaries and axis methods of interpretation, profile tolerances and symbology and modifiers tools.
Today a vast majority of CAD design is done in 3-D, and not all CAD programs provide intelligent GD&T data. There are two formats of GD&T definition data. Although both are labeled “3-D annotation,” one format is purely for display; the other feeds downstream applications. Presentation is the display only format for GD&T. While the tolerancing may be associated with the model, the information is just text. There is no intelligence behind the 3-D annotation. As a result, a human must interpret GD&T information. The presentation format is similar to typing a mathematical equation in Microsoft Word. It conveys information, but the computer cannot use it in a calculation. In conversation, this approach is commonly referred to as “decorating the model.”
Model-Based GD&T for Inspection
GD&T defines the standards of quality; inspection confirms that the quality standards are being met. Data flows directly into the inspection software if:
- GD&T representation is available.
- Inspection software can import GD&T from the native CAD system.
- Or if intelligent GD&T data is not included with the CAD model then it must be added manually and associated with the 3-D model by the inspection software.
When these conditions are satisfied, inspection planning, measuring and reporting become simple, fast, effective and error-free.
If your inspection software is based on a 3-D CAD platform, you can import intelligent GD&T data directly along with the 3-D model. In the case of presentation annotations, the quality or manufacturing engineer can determine which are relevant and simply add the GD&T specifications to the 3-D model when developing the inspection plan.
When the information is imported from the native CAD system as a GD&T representation, there is a true MBD implementation. The authority of the dataset is preserved. The same is true if GD&T display data (presentation) is imported directly or via STEP translation and then entered into the inspection application.
GD&T Overkill
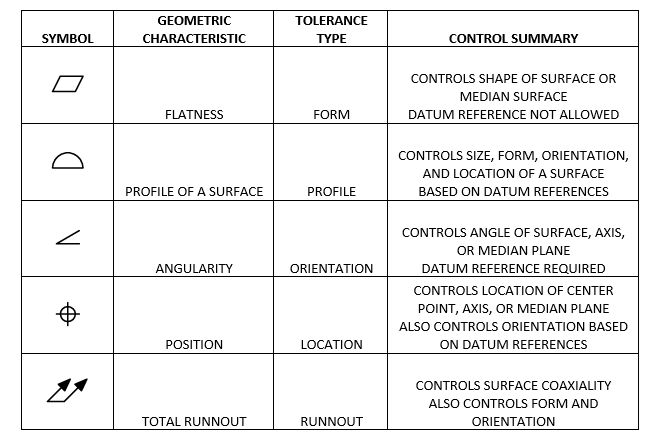
One might argue that you can never have too much data, but remember, with increased data there can also be increased overhead. The GD&T library of annotations is always evolving and becoming more complicated. Quite often design engineers over annotate. It then becomes the responsibility of manufacturing and quality engineers to determine which annotations preserve the design intent and include those intelligent GD&T datums in the inspection plan and the subsequent quality reporting. The reality of GD&T definition data is, most parts can be effectively inspected and reported against using only five of the annotation symbols. This is not to say the complete library is not important, it is. But understand what is necessary to ensure design intent and chose intelligent GD&T definitions thoughtfully. You want enough data to obtain your quality objective; GD&T overkill can slow the inspection process and produce unnecessary data that must be stored.
Closing the Loop
When the product definition flows from the model through inspection and reporting, the integrity of the quality assurance process is maintained, closing the loop on design intent and implementation by feeding back to the 3-D data authority.
It has long been said that you cannot improve what you cannot measure. Model-based GD&T inspections foster improvement by making it feasible to measure more, measure faster, and measure better.
Verisurf Software, Inc.
Verisurf Software, Inc. is an advanced three-dimensional measurement solutions company committed to delivering advanced computer-aided inspection and reverse engineering solutions. Verisurf software helps manufacturers of all sizes and industries produce higher quality products in less time and at a lower cost with automated, Model-Based Inspection processes. For more information, visit the Verisurf website at https://verisurf.com.
##


