New Collaborative Project Will Give
Manufacturing Some New Digital Threads
Read this story at NIST Tech Beat HERE
By Verisurf Software
January 6, 2015
National Institute of Standards and Technology (NIST) researchers and their industrial partners aim to add a new dimension to manufacturing capabilities. In a new project, they will demonstrate the feasibility—and benchmark the advantages—of using standardized, three-dimensional (3D) models for electronically exchanging and processing product and manufacturing information all the way from design through inspection of the final part, a tightly integrated, seamless string of activities that manufacturers are calling a “digital thread”.
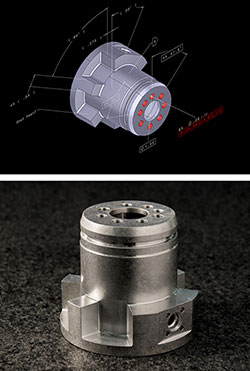
(right) In a new project, NIST and its partners will demonstrate and evaluate software tools for making parts directly from three-dimensional designs embedded with product and manufacturing information. (Part shown is a simplified design of a bearing seal.)
Credit: NIST
Compared with the prevailing practice of converting two-dimensional (2D) computer-aided design (CAD) drawings into static documents, 3D models embedded with data and instructions that computers can parse and process are expected to open the way to significant operational and bottom-line benefits. These include reduced cycle time and cost, less duplication of effort, lower risk of errors, increased part yields and higher-quality products.
Collaborators in the NIST-led project include interoperability-focused manufacturing-services providers International TechneGroup Incorporated (ITI), Milford, Ohio, and Advanced Collaboration Consulting Resources, Summerville, S.C.; Rockwell Collins, an Iowa-based manufacturer of avionics and communication equipment for defense and commercial uses; and Geater Machining and Manufacturing, an aerospace supplier located in Independence, Iowa. Other participants are CNC Software, a Tolland, Conn., maker of computer-aided manufacturing (CAM) software; Mitutoyo America, a maker of measurement equipment and software; and software vendor CoreTechnologie, Rossford, Ohio.
The Design to Manufacturing and Inspection Project leverages a new international standard for incorporating computer-readable product and manufacturing information (PMI) into 3D models that do not require human interpretation of graphical depictions and then, data re-entry. Just published by the International Organization for Standardization, ISO 10303-242 (best known as STEP AP 242) enables designers and process and systems engineers to embed 3D representations of parts with actionable specifications for materials, geometrical and dimensional tolerances, and surface texture, as well as process notes, finish requirements and other information.*
Like other interoperability standards in the STEP** family, AP 242 serves as a mediator between programs from different vendors. For example, a part design prepared with proprietary software is converted into the common language, format, and protocols of STEP AP 242 so it can be read by another vendor’s software, which typically retranslates the design instructions into its native language.
An alternative approach to achieving smooth exchanges of information across the full range of manufacturing-related operations is to use software from one vendor. However, this approach locks a company into a single proprietary solution, and it is not practical for companies to exchange product and manufacturing information with many suppliers and customers.
In the new project, Rockwell Collins will use its CAD system to generate a 3D design of a part, complete with all feature tolerances and other specifications. The design will be translated into STEP AP 242 so that Geater can repurpose the model into the language understood by the software it uses to generate machining instructions. Separately, Geater will reuse the STEPAP 242 model in software—with no manual data entry—to generate code that will direct a coordinate measuring machine to perform the inspection measurements necessary to determine whether the part is manufactured as designed.
At each stage in this thread, researchers will verify and validate translations involved in the data exchanges.
“Three-D model-based engineering is an important step toward ‘smart’ manufacturing systems,” says NIST systems analyst Allison Barnard Feeney, leader of the project. “These systems will need to be autonomous, self-aware and self-correcting. At the same time, they must be able to work harmoniously with human supervision and collaboration.”
A full-scale demonstration of end-to-end interoperability is expected by summer 2015. In follow-on work, NIST researchers will focus on strengthening and extending the digital thread to link a broader range of manufacturing-related activities such as assembly, bidding, engineering changes, in-process inspection, and visualization and collaboration.
* For a detailed discussion of STEP AP 242, see A. Barnard Feeney, S.P. Frechette, and V. Srinivasan, “A Portrait of an ISO STEP Tolerancing Standard as an Enabler of Smart Manufacturing Systems,” 13th CIRP Conference on Computer Aided Tolerancing, May 11-14, 2014; Hangzhou, China. Accessible HERE.
** STEP is the acronym for “Standard for the Exchange of Product model data.”


