Aligning Large Objects to Gravity
Industrial Machine and Tool Leveling and Alignment
Get a PDF version of this Tech Tip HERE
By Verisurf Software, Inc.
The requirement to align objects to gravity (level and plumb) in large volume metrology is common. Large aerospace tooling, machines, foundations, and structures must all be leveled to gravity to ensure proper performance.
Aerospace Tooling Structures
When working on large, floor-mounted tooling structures, it is common to use gravity in the form of level and plumb to maintain the basic configuration of the tool as gravity is a constant in every environment. This is particularly important when these large tooling structures are comprised of multiple base components as can be found in factories that build large aircraft components. While smaller tools can be held in a constant plane, large tools with multiple base components use jacks and level and plumb to maintain tool configuration.
During construction of a large tool, level and plumb is monitored daily to ensure the basic configuration of the tool has not changed significantly. The level and plumb processes are accomplished using many different types of measurement devices such as optical/digital levels, transits, theodolites, total stations, and laser trackers.
Above – using optical transit and level to plumb and level an aircraft assembly jig
Leveling a Machine
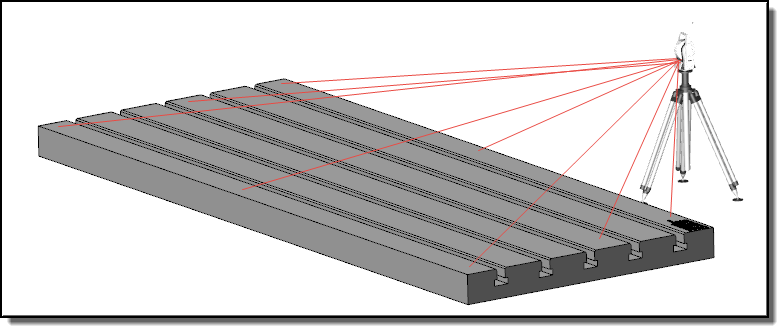
Machines typically require only a leveling process to ensure the machine bed is level to gravity which provides an accurate relationship of the machine head and the part mounted on the machine bed. This process is typically done when the machine is set up and then verified periodically or when the machine head crashes into a part.
Above – A laser tracker levelling a machine bed
Flat vs Level
These terms are often referred to as being one and the same when they are fundamentally different.
- Flat describes the planarity of a surface and can be used to determine; flatness, parallelism, and perpendicularity.
- Level describes the orientation of an object relative to the earth’s gravity. When building structures, gravity is used as a frame of reference as it is always consistent and can be verified at any time, it also aligns the object in a manner that visually looks correct to us.
In the case of machine beds, fatness and level can be equally important, whereas, for structures, the requirement may only be level to particular locations on the structure.
Above – An object that is both flat and level and an object that is flat but not Level
How to Level an Object Using Verisurf
To level and plumb an object in Verisurf, the measurement device must have tilt sensors and be oriented to gravity through the Verisurf Device Interface (VDI). This process will vary depending on which type of device is connected to Verisurf.
To quickly align the measurement device using points on the object and the gravity vector of the active device:
- Measure points on the object plane to be leveled. These should be repeatable point locations to speed the leveling process.
Note: Measurements above jacking points provide greater control during the adjustment process.
- From the Alignment Toolbar select Feature Align:
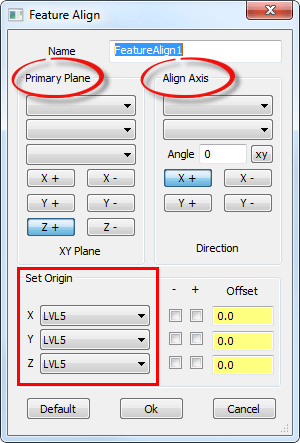
In the Feature Align dialog box the Primary Plane and Align Axis must be set to NONE. Verisurf then defaults the alignment axis to the Z+ standing axis of the Device that was previously leveled to gravity in the VDI.
Verisurf automatically sets the point with the highest Z value as the origin of the alignment.
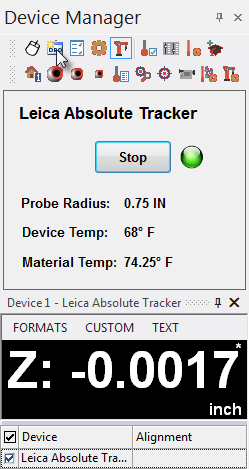
The operator needs only to select OK and proceed to level the object using a Digital Readout (DRO) from the Device Manager (below right).
- In the Device Manager, select DRO from the Toolbar, to open a Digital Readout, using ONLY the Z value, adjust the object until Z is close to 0.0000 within the expected tolerance.
Using the Custom dropdown, the operator may customize the DRO to display Z only.
Note – Measurement accuracy and repeatability can be affected by vibration, air movement, instrument instability, and large temperature changes.
How to Plumb an Object Using Verisurf
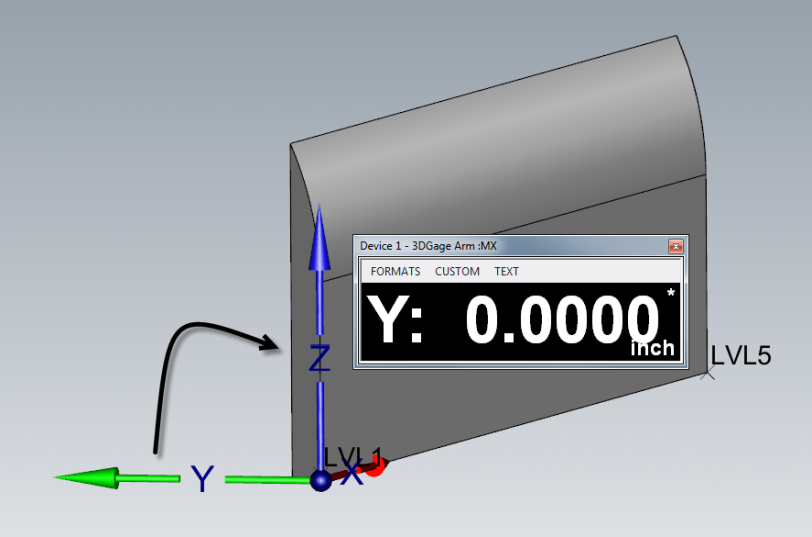
To “Plumb” means to make vertical relative to gravity. In Verisurf, this capability is enabled by making one adjustment to the Feature Align to make it easy to understand for the operator performing the task of plumbing. The operator must measure two points at the base of the vertical plane to be plumbed. Choose “Align Axis” to create a Working Coordinate System (WCS – shown below).
- The measurement device properly oriented to gravity using the Verisurf Device Interface.
- Measure the points to be used for leveling the object.
- Measure Two Points that are parallel to the direction the object must be plumbed. These two points will be used to align the secondary axis providing direction for the plumbing process.
- From the Alignment Toolbar select Feature Align:
In the Feature Align dialog box, the Primary Plane must be set to NONE. This defaults the Z+ axis to the Device Z+ standing axis that was previously leveled to gravity in the Verisurf Device Interface.
In the Align Axis group define the Axis that is parallel to the surface/features to be plumbed. The actual level conditions of these points are not critical as Verisurf uses the standing axis of the measurement device to determine the true vertical axis (in this example Z+). Using the secondary axis merely provides directional information for the alignment to aid in the plumbing process.
- Select OK to save the alignment.
- In the Device Manager, select DRO from the Toolbar, to open a Digital Readout. Using the Custom dropdown, the operator may customize the DRO to display Y only.
- To plumb the object (using example shown), adjust the Y value until it is close to 0.0000 within the required tolerance to plumb the part.
Note – Measurement accuracy and repeatability can be affected by vibration, air movement, instrument instability, and large temperature changes.
Note – If the part being leveled and plumbed requires significant adjustment, re-measuring and re-aligning may be required to meet the required tolerances. Typically, adjusting an object for level first is the easiest method, as plumb will often time be very close after the object has been properly leveled.
Industrial Alignment BUILD Products
Laser Tracker Articles


